Followers

Showing posts with label English history. Show all posts

Saturday, 13 October 2018

The seven kingdoms of old England


If you have ever wondered about the names of the English counties Essex and Sussex, not to mention the region of Wessex as beloved by the novelist Thomas Hardy, you might be interested to know that they are not as “sexy” as might be imagined. They were all ruled by their own kings many centuries ago, and the names are relics of those times.
The seven kingdoms were established by the Germanic tribes that moved into what is now England as the Roman Empire faded away and left a power vacuum. In 410 AD the last Roman troops departed and left the “Romano-British” to fend for themselves. 
One account states that in about 450 a chieftain named Vortigern invited two brothers named Hengist and Horsa to bring an army to Britain to defend the British against the Picts who were invading from the far north. However, once this threat had been seen off the invited mercenaries decided not to go home but to settle in what became the Kingdom of Kent in the south-east corner of Britain.
Not long after, settlers from Saxony (modern Germany) arrived on the south coast and spread across a wide area, eventually creating the kingdoms of the East Saxons (Essex) South Saxons (Sussex) and West Saxons (Wessex). 
Other settlers, who are generally referred to as Angles, arrived in what is now Norfolk and Suffolk, leading to the founding of the Kingdom of East Anglia. Despite their relative unimportance in the overall history of the country, it was the Angles who would eventually give their name to the whole country south of Scotland and east of Wales, namely England.
The last kingdoms to be established were those of Mercia (the Midlands) and Northumbria (north of the River Humber).
The seven kingdoms that emerged in the 5th to 7th centuries are generally known as the Heptarchy. They would remain in place for about 200 years until Danish invaders put an end to the eastern kingdoms and were only kept from taking over the whole of England by the obduracy of Wessex.
During the period of the Heptarchy the kings spent much of their time warring against each other. Their aim was not so much to absorb each others’ territory as to establish themselves as ‘senior king’. The king who achieved temporary domination was known as the Bretwalda which translated as ‘ruler of Britain’ but it did not signify anything other than that the holder was more powerful than the other kings and could make demands on them. The title was not hereditary, and any other king might become Bretwalda when the holder died or was defeated in battle.
During the period of the Heptarchy only Essex failed to produce a Bretwalda at some time or another. The only Bretwalda of the 8th century who came close to being ruler of all England in any meaningful sense was Offa of Mercia (757-96), who used the title ‘King of the English’ but was never completely dominant.
The last Bretwalda was Egbert of Wessex (802-39), who can be titled the first true ‘King of the English’, in that he united Wessex and Kent (Sussex, Essex and East Anglia had already been absorbed by their neighbours) and then conquered Mercia and received the formal submission of Northumbria. However, he could not hold on to his gains for long and Mercia again became independent.
The end of the Heptarchy came with the Danish invasions of the 9th century that left Wessex, led by Egbert’s grandson Alfred, as the sole bastion of the English in resisting the onslaught.
© John Welford

Tuesday, 17 July 2018

The defeat of the Spanish Armada


The defeat of the Spanish Armada was one of the great turning points of English history. Before, there was a real possibility that England could suffer another “1066” and be conquered by a foreign power. Afterwards, Queen Elizabeth I enjoyed security on her throne and England was set to become a major world power and the champion of Protestantism in Europe.

The Armada was a fleet of 132 ships sent by the Spanish king, Philip II, to invade England and seize the throne from Elizabeth. He had been the husband of Elizabeth’s half-sister, Queen Mary I, who had died childless in 1558. Mary had sought to return England to Roman Catholicism, and Philip had the same end in view.

The gap of 30 years between Mary’s death and the sending of the Armada is evidence of the political power game, played by the European nations, which had given Philip some hope that England might return to Rome by other means (including a proposal of marriage to Elizabeth!). Elizabeth was a consummate politician and the mistress of delay and indecision when it suited her. She was thus able to keep Philip at arms’ length for many years.

Philip also had other things on his mind, not least the struggle to retain control of the Spanish Netherlands (modern day Netherlands and Belgium).

However, Philip’s patience was sorely tried by the activities of sea captains such as Francis Drake who behaved virtually as pirates in their attacking of Spanish ships and colonies. Spain was the major colonial power in the Americas, and Spanish ships, laden with gold and other treasure and produce, were easy targets for seamen who were not easily controlled by their home government, even had that been intended. The fact that Elizabeth was happy to accept captured Spanish booty, and the honours bestowed on Drake and other “pirates”, suggests that little such control was to be expected!

England also began to have colonial ambitions. In 1584, for example, Walter Raleigh had founded the colony of Virginia, named in honour of Elizabeth, the “Virgin Queen”. England and Spain were therefore brought into conflict as colonial as well as religious rivals.

Preparations on both sides

The construction of the Armada began as early as 1585, but there were many delays and setbacks to its completion. Not the least of these was the action by Francis Drake in 1587 of sailing into the port of Cadiz and destroying much of the Spanish fleet. The action was described by Drake as “singeing the King of Spain’s beard”.

One thing the Spanish did not have was the element of surprise. The English knew all about the invasion plans and were well prepared for it when it came, which was in 1588. The story of Drake insisting on finishing his game of bowls before taking on the Spanish is probably apocryphal, but it summarises the relaxed approach that the English were able to take.

The idea behind the Armada was not to defeat the English at sea, but to carry troops, some of whom were to travel from Spain but the bulk of whom were to be transported from the Spanish Netherlands across the English Channel to the Thames Estuary, where they would be landed and then make a direct assault on London. Only 22 ships in the Armada fleet were purpose-built warships, the rest comprising adapted merchant ships of various types.

The English fleet that confronted the Spanish Armada was similar in composition to that of the Armada, in that the bulk of the ships were armed merchant vessels rather than purpose-built warships. These warships were similar in design to the Spanish galleons but smaller and therefore more manoeuvrable, although having similar armaments.

One huge advantage that the English had from the outset was that their commanders knew what they were doing but the Spanish did not. The English Lord High Admiral, Howard of Effingham, was both a seaman and a politician, as well as being a first cousin of Anne Boleyn, Elizabeth’s late mother. He was ably assisted by Francis Drake, who was a consummate seaman (he had sailed round the world and been knighted on his return in 1581) who also knew the Spanish inside out from his frequent skirmishes with them.

On the other hand, the Spanish fleet was led by the Duke of Medina Sidonia, who had no experience of fighting, either on land or sea, and was probably appointed (as a late substitute for the Marquis of Santa Cruz who died in February 1588) because Philip knew that Medina Sidonia would follow his orders to the letter, and the last thing Philip wanted was a commander who would show any initiative of his own.

Medina Sidonia knew all along that he was the wrong man for the job, and pleaded with Philip to be relieved from the responsibility. Apart from anything else, he suffered badly from sea-sickness! However, his pleas were turned down, and it is even possible that his letter to Philip was never shown to the King, because his courtiers knew exactly what his response would be.

Indeed, Philip’s main fault was his desire to micro-manage the whole affair. The plan was Philip’s from the outset, namely to use the Armada to collect the 30,000 strong army of the Duke of Parma and sail it across the channel to England. Parma had already suggested to Philip that he could do this without naval support, relying instead on surprise, a fleet of lightly armed barges, and an expected uprising by English Catholics, but he was overruled. He had no choice but to wait for the Armada to arrive.

The progress of the Armada

As the Armada reached sight of England on 19th July, beacons were lit that conveyed the news to London faster than any messenger could achieve; as the hill-top watchers saw the distant light from a burning beacon they would light their own so that it would be seen by the next in the chain.

As it happened, Drake’s response was delayed not so much by an unfinished game of bowls as by an unfavourable tide. Most of the English fleet was holed up in Plymouth Harbour, ready to pounce on the Armada as it came into sight, but the low tide prevented this. The Spanish had an opportunity to take advantage by blockading the harbour and attacking the English ships when they emerged, but this idea was turned down because it did not accord with Philip’s orders.

Instead, the Armada was allowed to continue up the English Channel with the English fleet, once the tide had turned, in pursuit. Several small engagements took place, notably at Eddystone near Plymouth, and off Portland Bill, but little damage was suffered by either side.

Two Spanish ships managed to collide with each other and Drake, ever the opportunist, decided to raid the crippled ships at night for whatever they might have on board. However, this move led to other ships of the fleet not knowing where he had gone and, when dawn broke, the fleet was completely out of formation. It took a day for the ships to regroup, by which time the Armada was out of sight. However, the greater speed of the English ships allowed them to catch up.

The most significant engagement on the way up the Channel occurred off the Isle of Wight, when the English fleet divided into four squadrons and sailed towards the Armada ready for battle. However, Medina Sidonia was afraid that his larger ships might be driven on to sand banks close to shore and ordered them to escape to the open sea. He now had no choice but to sail straight for the French coast at Dunkirk, where he hoped that Parma’s army was waiting.

However, the Duke of Parma had problems of his own, and his army was far from ready to embark and be escorted to England. Apart from anything else, the 30,000 troops had been reduced to 16,000 by disease, and Dutch vessels were blockading the port of Dunkirk.

The Armada therefore had to wait offshore near Calais, anchored in a crescent formation. Medina Sidonia now had a dilemma. Parma wanted him to send part of his fleet along the coast to deal with the Dutch blockaders, thus enabling the troops to make their way to the waiting Armada, but Medina Sidonia was wary of weakening his fleet as the English approached. It was a marine version of rock versus hard place.

As it happened, the initiative now lay with the English, who used a trick that had been used in similar situations in the past. This was to sacrifice eight of the fleet’s ships as fireships, setting fire to them and letting them drift towards the enemy at night. The effect of this tactic was mainly psychological, because the Spanish had no idea whether the burning ships might not contain large charges of gunpowder that would explode with devastating consequences. They did not know that the English did not have that much gunpowder to spare.

The result of the fireship attack was exactly what Howard and Drake intended, namely that a number of Spanish ships cut their anchor chains and broke formation to escape. No ships were actually set alight by the fireships, but that did not matter. The Spanish now had no choice but to engage in direct battle with the English.

The Battle of Gravelines

The Battle of Gravelines, on 29th July, was the decisive action of the campaign, and was fought very much on English terms. The Spanish ships were not prepared for a full-scale naval engagement but for an invasion, and this was what led to their defeat. As it happened, they had plenty of ammunition for their cannons, but were in little position to use it. For one thing, the gun decks were so cluttered with stores that the guns could only be fired once, there being no space to run them back far enough to reload. For another, the Armada had more Catholic priests on board (for the expected forced conversion of England) than trained gunners.

The Spanish tactic was for the cannon to be fired once and the gunners then to man the rigging in preparation for boarding the crippled English ships. However, this would only be possible if the English ships got close enough, and the English captains made sure that this did not happen.

Instead, once the Spanish guns had fired their single shots, the English closed to a range that enabled their guns to have maximum impact on the thick oak timbers of the Spanish ships, especially when the ships heeled over and timbers were exposed that were normally below the waterline.

Given the tactics employed by each side, the Battle of Gravelines could only have one winner, although it was the English who were forced to disengage when they ran out of ammunition.

In terms of ships lost, the number of Spanish casualties was not all that great, given that only five ships were rendered unserviceable. However, many others had been badly damaged and had to withdraw from the battle. Apart from the fireships, no English vessels were lost. More than 600 Spanish sailors and soldiers died, to fewer than 100 on the English side.

The Armada escapes

With the wind blowing from the south, the Armada had no choice but to escape northwards, into the North Sea. There was now no chance of Philip’s plan being put into action and, for the Spanish fleet, there was only one way home.

The English chased the Spanish ships northwards as far as the Firth of Forth, so that any thoughts of returning to the Spanish Netherlands were made impossible. The English army force at Tilbury was reinforced in case any further attempts were made at an incursion up the Thames Estuary, and it was therefore at Tilbury that Queen Elizabeth made her famous victory speech on 8th August.

The Armada limped home, suffering far more losses than it had done during the battle. Due to a navigational error it sailed much closer to the western coasts of Scotland and Ireland than it should have done, and those ships that had jettisoned their anchors in panic during the fireships attack were unable to find shelter when the weather turned bad, instead being driven ashore and wrecked on the rocks.

September 1588 was a particularly bad month for Atlantic storms which, combined with the weak condition of many of the sailors due to disease and lack of food and water, led to many of the Armada ships, particularly the smaller and lighter ones, being lost. A number of Armada wrecks have been discovered in recent years, with the contents giving evidence not only of the daily lives of Spanish sailors and soldiers but of the supplies that were intended to support an invasion force.

Some Spaniards who were driven ashore did survive, and there are stories of “Spanish-Irish” children being born during the following years. Only about 10,000 of the men who set out from Spain, and half the ships, returned there.

The aftermath

Despite this massive setback for Philip of Spain, the balance of power on the high seas was little changed, with Spanish hegemony being scarcely dented. Most of the 22 galleons survived the battle and the Atlantic storms, and, after repair, remained perfectly serviceable.

However, English confidence was greatly boosted, as was the position of Protestantism in England. Above all, the role of the weather in deciding the issue was seen by many as divine confirmation of the rightness of Elizabeth’s rule and of the English Reformation. The phrase “He blew with his winds and they were scattered” was inscribed on a victory medal and the storm was also given the name of “the Protestant wind”.

Even without the intervention of the elements, there is little chance that the Armada could have succeeded, simply because the English people would surely never have allowed themselves to be ruled by an autocratic (and Catholic) Spanish monarch. Even if Queen Elizabeth had been overthrown and executed, it is surely inconceivable that “King Philip of England” would have lasted very long.

Why the Spanish Armada was defeated

The traditional view held by the British as to why the Spanish Armada failed in its objectives was that the Spanish were out-fought and out-manoeuvred by Sir Francis Drake and Lord Howard of Effingham, aided in no small measure by the vagaries of the British weather. There is much to support this opinion, but it is not the whole story.

Philip had also deluded himself into believing that England was longing to return to being a Catholic country, which it had not been since the death of Queen Mary I (who was married to Philip) in 1558. However, that was 30 years ago, and the bulk of the English population saw no reason to change. Those with long memories had no desire for a savage regime similar to that of “Bloody Mary” with anti-Catholics being burned at the stake.

England under Elizabeth was entering a golden age, partly thanks to the overseas enterprises of men like Drake and Raleigh, the latter of whom was trying to establish a colony on the coast of North America, and which was to evolve into the state of Virginia. The English (later British) Empire was in its infancy and the future looked good. This gave the English pride and a sense of independence that they had no intention of surrendering by making a backward step. Philip had not taken this on board.

In other words, the plan for the Armada was never going to work. Had the Armada been able to collect the Duke of Parma’s troops and sail up the Thames with them it would have been met with the full might of the English army, then assembling at Tilbury, as well as being trapped by the English fleet that would have followed them closely. Without any chance of reinforcement, the Spanish soldiers would have stood no chance of victory.

Philip knew all about Drake’s cleverness and ability to think quickly and decisively, but he took no steps to counteract the threat. When given the opportunity to blockade Drake’s fleet at Plymouth, Medina Sidonia did not take it because Philip’s orders had been to race up the Channel as quickly as possible, thus ensuring that Drake would be hard on his heels. Why did Philip not have a Plan B to deal with such an eventuality? With part of the Spanish fleet preventing Drake from leaving Plymouth, the rest of the Armada might have had a chance of reaching their objective.

So, what the Spanish had was a poor plan, poorly executed by inadequate leaders, with their orders coming from a king in Spain who had no idea of what was happening at the “sharp end”. 

© John Welford

Thursday, 5 April 2018

Kingweston and the Bloody Assizes


The county of Somerset was at the heart of the Monmouth Rebellion of 1685, when the Duke of Monmouth, a bastard son of Charles II, led a rebellion against his uncle, the Catholic King James II. Although having some initial successes, the rebels were always short of men and materials, and failed to push beyond the Somerset borders. The battle that sealed the fate of the rebellion took place on Sedgemoor, near Bridgwater, on 6th July 1685. This was the last battle ever fought on English soil.

James took revenge on the rebels in no uncertain way. Trials were held throughout the West Country of people who had any connection with the rebellion, under the direction of Lord Chief Justice George Jeffreys. The savagery of the proceedings, and the summary nature of the justice that was meted out to many, led to them being known ever since as the “Bloody Assizes”.

More than 1400 people were brought before Jeffreys and his colleagues, and most of the accused were sentenced to death, many by “hanging, drawing and quartering”. However, some 800 sentences were commuted to transportation to the West Indies, where the victims were treated as virtual slaves on the plantations.

So what has this stone building on a quiet Somerset farm to do with all this? Although most of the trials were held in the county towns of Winchester, Dorchester and Taunton, others took place in much smaller places, such as the village of Kingweston that is only a few miles from the battle site of Sedgemoor. The old courthouse is still there, although it has long been absolved of its legacy as a place where terrible justice was delivered to peasants who had the misfortune to get caught up in a rebellion they probably had little understanding of.

Among the trials held in Somerset (although probably not at Kingweston) were those of a group of schoolgirls, aged 6 to 14, whose crime was to wave at the Duke and his soldiers as they rode past. The punishment was a fine so heavy that it could never be paid.

James II was far more like his father (Charles I) than was his brother (Charles II), at least in terms of his ignorance of the arts of practical politics. James’s oppression of the West Country came home to roost three years later when William of Orange followed Monmouth’s example and landed in the south-west at the start of his campaign for the Crown. The men of Somerset were happy to support William, and the strength of their opposition to James meant that there was to be no second Battle of Sedgemoor.

Folk memory can be long and unforgiving. Even today, when battle re-enactments of Sedgemoor take place, some pub landlords have been known to refuse to serve the men playing the parts of James’s soldiers!

As for Kingweston, it went back to sleep, and the farm where the courthouse now stands offers excellent bed and breakfast!

© John Welford


Wednesday, 4 April 2018

The Birds Have Flown: How King Charles I made Civil War inevitable


After King Charles I failed to arrest five of his opponents in the House of Commons, there was no alternative to Civil War.

Opposition to the King

King Charles I came to the throne in 1625, utterly convinced that he had been put there by God and that his governance must therefore be beyond question. The newly created United Kingdom of England and Scotland had a Parliament that sat at Westminster but its sole function – as Charles saw things – was to enact his policies and raise the necessary funds for any wars or other forays that incurred expense.

Although Charles had plenty of support among the elected Member of Parliament, who were hardly tribunes of the people but representatives of the country’s squires, wealthy landowners and successful merchants, there was also a good deal of opposition.

The anti-Charles brigade consisted partly of those who objected to raising taxes to pay for Charles’s adventures – the MPs were, after all, among those who would be out of pocket – and also those who were fundamentally against what they saw as the King’s dangerously anti-Reformation religious views.

Within a few weeks of coming to the throne Charles married a French princess, Henrietta Maria, who was openly Catholic and did nothing to temper her Catholicism once she became the Queen of an officially Protestant country. The fear was therefore that she would bring her children up as Catholics, a fear that was given added weight when she brought a coterie of French Catholics with her – including priests – shortly after her marriage.

Many of the Protestants in Parliament were radicals who sought to strip the Church of England of all vestiges of Catholicism. They became known in general parlance as Puritans, because they sought to purify the Church, and many would later find that their efforts could not go anything like as far as they wished. Some founded new “dissenting” religious bodies and some emigrated to the American colonies where they hoped to be free to practice their religion in their own way.

During the period leading up to the 1640s, therefore, the stage was set for violent conflict between the King and Members of Parliament.

Strafford and Laud

Charles relied on two supporters who were every bit as pig-headed as himself and refused to take account of the strength of feeling in Parliament and the country in general. Both believed that they could get their way through force, and both would ultimately pay for this approach by losing their heads on the block.

Sir Thomas Wentworth, who was later given the title of Earl of Strafford, had at first been on the side of reform but then took the view that the reformers were going too far and so he became a staunch defender of the status quo and the “Divine Right of Kings”. He became Charles’s chief adviser, his advice usually being to take strong measures against the King’s opponents.

Archbishop William Laud was an extreme opponent of Puritanism and a stickler for the rules that governed worship in the Church of England. He saw no scope for compromise and imposed stern punishments on anyone who opposed him.

Strafford and Laud worked together to ensure that Charles would get his way, but – not surprisingly – they provided plenty of ammunition for the “equal and opposite reaction” that would eventually lead to the deaths of all three of them.

King Charles’s False Moves

Charles soon found himself in trouble when he tried to use Parliament to raise money for his personal expenses and to finance foreign wars. He summoned Parliament on his accession in 1625 in the belief that they would follow precedent by granting him “tonnage and poundage” for life, but Parliament refused to do so and insisted that Charles should renew this grant on an annual basis. However, although the first year’s payment was agreed by the House of Commons, the House of Lords would not grant even that, and Charles promptly dismissed Parliament after it had sat for only two months.

Charles tried again in 1626 but had no more success than before. Instead, he set about levying “forced loans” on wealthy men – a tactic that his predecessor King Henry VII had used to great effect. However, Charles tried to force money from many subjects who were far from rich and the courts were soon full of non-payers who were promptly sent to prison.

The Parliament of 1628 was therefore occupied with the “Petition of Right” – a latter-day Magna Carta that the Members wished to present to the King with their demands for the ending of non-Parliamentary taxation and arbitrary imprisonment. The King reluctantly signed it, thus apparently conceding that his power was not as absolute as he had assumed.

However, Charles had no intention of giving way to Parliament. This became apparent in 1629 when the issue of church ceremonial came up for debate. William Laud was at that time Bishop of London, and he was keen on restoring rituals to the Church of England that had long been neglected.

The Puritans in Parliament objected but Charles refused to allow any discussion on the matter to take place. When the King’s messenger knocked on the door of the chamber to tell the members to stop the debate he was refused admission and the Speaker of the House was forcibly restrained from leaving his chair. The House promptly condemned the actions of Bishop Laud and also passed more resolutions against non-Parliamentary taxation.

The King’s response was what might have been expected. He had nine Parliamentarians imprisoned in the Tower of London and dissolved Parliament yet again. This time he was determined to do without Parliament altogether – he would not recall it again for another eleven years.

Ship Money

Charles still needed money. Despite the provisions of the Petition of Right he still reckoned that he could raise funds without recourse to Parliament. He did this by taking advantage of the medieval tradition by which sheriffs in coastal counties could levy taxation on behalf of the king for the purpose of building and equipping ships for royal service in time of war.

However, Charles went further than this and demanded that ship money be raised from inland counties as well, and even when the country was not at war. It was quite clear that he had no intention of using the proceeds for anything to do with ships and that this was simply a backdoor way of raising general funds. The first writs for ship money were issued in 1634 with further writs in 1635 and 1636.

Not surprisingly, the raising of ship money led to considerable opposition, with John Hampden, a Buckinghamshire landowner and member of Charles’s first three Parliaments, being the most prominent critic.

In 1637 Hampden refused to pay the tax and was put on trial. Twelve judges heard the case and found against Hampden by seven to five. This margin was narrow enough to give heart to other potential payers, many of whom also refused to pay. Although the levying of ship money had been very lucrative at first it soon ceased to be so. By 1639 only 20% of the expected revenue was flowing into the King’s coffers. John Hampden, on the other hand, became a celebrated figure in the struggle of Parliament against the King and he has long been regarded as one of the heroes of the English Revolution.

Parliament Resumes - Briefly

In 1640 King Charles had no choice but to call a fresh Parliament, his aim – as ever – being to raise revenue. In this case he needed funds to finance a war, but he must have known that this was never going to be easy.

The war in question was the first phase of the Civil War, because it was to be fought against an army of rebellious Scots (known as the “Covenanters”) who had occupied the north of England. This was to become known as the “Bishops’ War” because the rebellion resulted from Charles’s attempt to impose the full panoply of the Church of England - Bishops, Prayer Book and all – on worshippers in Scotland. The money Charles hoped to raise would be used to defray the expenses of the Scots who would then be persuaded to return back across the border.

However, Parliament could see that they had the upper hand and took the opportunity to make a series of demands on the King as their price for coughing up the cash. These demands included the ending of ship money and various reforms in the Church of England. Charles decided that the price was too much to pay and dissolved what would become known as the Short Parliament, which lasted for only three weeks.

Charles Tries Again

The Short Parliament had been dissolved in May 1640, but in November Charles could see no alternative to summoning a fresh Parliament, for the same reason as before. However, nothing had changed since the earlier attempt, apart from the growing anger of Parliament.

The result, for Charles and his supporters, was a complete disaster. Parliament was now emboldened and the Puritan wing seized its chance. Led by John Pym, the members demanded that the Earl of Strafford be put on trial for being “the principal author and promoter of all those counsels which had exposed the kingdom to so much ruin”. A “bill of attainder” was drawn up, which was in effect a death sentence for Strafford. With the Scots still occupying the north of England and mobs creating havoc in London, Charles had no choice but to sign it and send his chief adviser to the block.

Archbishop Laud fared no better. In 1641 Parliament passed the “Grand Remonstrance” that listed all their grievances (204 in total) including many for which Laud had to take the blame. His arrest followed soon afterwards although he was not executed until 1645.

Another act passed by this Parliament ensured that it could not be dissolved except by its own decision. It therefore remained in place until 1648 and was the Long Parliament that followed the Short one.

A Desperate Response

It is interesting to note that the Grand Remonstrance only passed in the House of Commons by a majority of 11 votes (159 to 148). In other words, many MPs thought that the Puritans were going too far and there was indeed considerable support for King Charles within Parliament, especially if the House of Lords was also taken into account. Had Charles had any sense he might have sought to reach a compromise agreement with Parliament that could have avoided the eventual outcome. However, Charles did not do compromise – probably because he did not have any sense.

His response was to take direct action. He instructed his Attorney General to begin proceedings for treason against his five sternest critics in the House of Commons, namely John Pym, John Hampden, Denzil Holles, William Strode and Arthur Hazelrig. One member of the House of Lords was also indicted.

Charles then did something extraordinary. On Tuesday 4th January 1642 he marched down Whitehall with a party of guards and entered the Parliament Building at Westminster, fully intending to arrest the five Commons members there and then. However, he had fallen straight into a trap, in that John Pym and the others knew exactly what Charles was up to.

When Charles demanded that the Commons Speaker point out to him the five men in question, the Speaker refused to do so. Charles then said that his eyes were as good as anyone else’s and he tried to pick out the five for himself. However, they were not there, having already left Westminster and taken a boat to escape down the river Thames.

Charles then made his famous remark that “all my birds have flown” and left the chamber with the catcalls of the members ringing out behind him. Any respect for his royal personage had clearly been replaced by utter hatred and contempt.

This was the turning point. Charles saw no way forward other than military action to force his will on Parliament. On 10 January he left London, firstly for Hampton Court and then York, where he hoped to raise an army to fight his course. His Catholic Queen, Henrietta Maria, headed for Holland with her children and the Crown Jewels. The English Civil War was about to begin.
©John Welford

Tuesday, 3 April 2018

The non-reign of Queen Matilda


Who was the first Queen of England? This question refers to queens who ruled as monarch, as opposed to being the wife of a king (by convention, such a lady is given the honorary title of Queen, but the husband of a reigning queen is never titled King!). The official answer is Mary I, unless one allows Lady Jane Grey to be credited for her nine-day “rule” in 1553. However, for a few brief periods in the 12th century it could be said that “Queen Matilda” was more in charge than anybody else.

Matilda and Stephen
The messy period of civil war that followed the death of King Henry I in 1135 was due entirely to the unwillingness of the English aristocracy to be ruled by a woman. King Henry’s only legitimate male heir had been William the Aetheling who had drowned in the White Ship tragedy of 1120. Henry twice made his barons swear allegiance to his daughter Matilda, but they clearly did so under duress because as soon as Henry was in his grave they offered the crown to Henry’s nephew, Stephen of Blois (the province immediately south of Normandy), although it might be fairer to say that Stephen seized the crown and the barons were not minded to put up much resistance. 
Stephen had had a lucky escape in 1120 because he had chosen to cross the Channel that night in Henry’s ship rather than William’s. It should probably not be wondered at that questions have been raised as to whether there might not have been some sinister reason for Stephen’s choice. However, it is difficult to see how he could have known that the White Ship would be lost with all hands or, indeed, could have arranged that this would happen. 
The fact remains that as soon as Henry died, having eaten too many lampreys (a sort of eel) at a banquet in Normandy, Stephen set off immediately for Winchester and grabbed hold of the royal treasury. He was crowned king three weeks later.

Civil war breaks out
This did not please Matilda, who possessed the Norman fighting spirit in no little measure. A confusing 20-year period of history was to follow in which the fortunes of the two cousins ebbed and flowed. Armies were raised, nobles were bribed, and horrific acts of savagery were performed as the conflict became increasingly bitter.
There were times when Matilda was able to capture Stephen and others when Stephen captured Matilda, but neither could keep the upper hand for long. On one occasion Matilda and her followers escaped from a castle in the depth of winter; they dressed in white so that they would not be seen against the snow.
One thing that eventually became clear was that neither Stephen nor Matilda would be acceptable as ruler of England. Stephen was too weak, inconstant and good-natured to be an effective medieval monarch. Matilda, on the other hand, was spiteful, vengeful and bloody-minded. Neither was likely to attract the wholehearted support of the barons for long.
Indeed, the barons at first regarded the civil war as a good excuse for settling old scores with each other. Each local strongman built himself a castle and set off to ravage the lands of his neighbours, which was easy to do if the neighbours in question had declared for the rival royal claimant. 

The end of the war
However, the net result was that nobody benefitted from a situation of general anarchy. Crops were not grown or harvested and the barons had to spend more on arming men to fight than they would be getting if those men were farming their land and paying their rents. 
With the country facing starvation and the war between two unattractive opponents getting nowhere, a truce was eventually arrived at. Matilda agreed that she would surrender her claim in favour of her son, Count Henry of Anjou. This would come into effect on the death of Stephen, who was not in good health. As it happened, Stephen died in 1154, only a year after the truce was declared, and the throne passed peacefully to King Henry II who would thus be the founder of the Plantagenet dynasty that would rule England for the next 331 years.
Matilda outlived Stephen by twelve years. She never ruled as queen, but was for a brief time known as “The Lady of the English” during one of her brief periods of power. There would be powerful women at the helm in England in the years to come – Edward II’s wife Isabella comes to mind – but an official queen would not sit on the throne until almost exactly 400 years later.

© John Welford

Monday, 2 April 2018

The Sutton Hoo ship burial


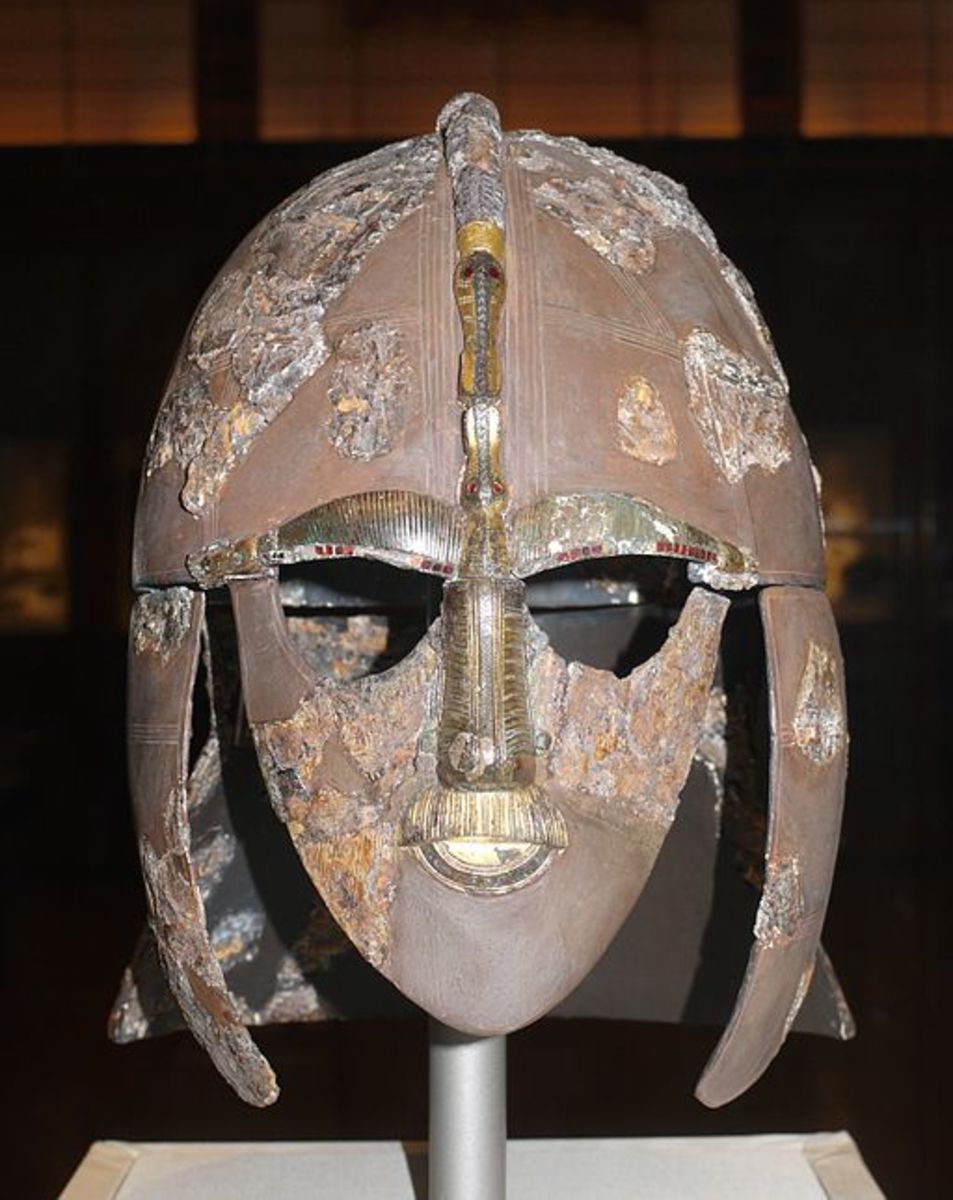
 The Sutton Hoo helmet, on display in the British Museum

Sutton Hoo is an important archaeological site in Suffolk, England. It is the burial site of an early English king, and has been described as the English equivalent of the tomb of Tutankhamun.
 King Raedwald of East Anglia
After the recall of the Roman administration of England in 410 AD, the land became open to settlement by tribes from the near continent, notably from what is now Denmark and northern Germany. One of these tribes was the Angles, who originated from what became the German state of Schleswig-Holstein, immediately south of the Danish peninsula.
The Angles settled mainly in what are now the English counties of Norfolk, Suffolk and Cambridgeshire, and would have been well established in the area before the reign of King Raedwald, who was probably king from 599 to 624.
By this time, the Anglo-Saxon kingdoms had come under the influence of Christian missionaries, most notably Augustine who had arrived in Kent in 597. Raedwald was the second English king to be baptized as a Christian, the ceremony taking place at the court of the first such convert, namely King Ethelbert of Kent, in about the year 605.
However, it would take a long time for the culture and practices of Christianity, as directed by bishops from Rome, to wholly replace those of the formerly pagan English monarchies, and this is evident from the burial customs that are revealed by the Sutton Hoo site, and others.
Raedwald was therefore buried in a manner that was consistent with the Norse tradition of laying the king’s body in one of his ships, together with many of his former possessions, and burying the ship under a raised mound of earth. There is no evidence that ships were ever set on fire and pushed out to sea, as Hollywood directors might fondly imagine, but the body was often cremated within the ship before it was buried.

The Sutton Hoo burial
The site is close to the River Deben at Woodbridge, Suffolk. Visitors are able to walk round the site, which contains a total of 17 burial mounds that date back to prehistoric times, and view an exhibition that tells the story of King Raedwald and explains how the site was excavated, but the treasures that were found are now housed in London’s British Museum, with replicas being on view at the site itself.
It is evident that Raedwald acquired considerable power and wealth during his lifetime, because the items that were buried with him were of extremely high quality. It is clear that the Angles shared with the ancient Egyptians the belief that a monarch needed to be well provided for in the afterlife, hence the nature of the possessions that he was expected to take with him.
The excavation of the site began in 1939 when the owner of the land, Mrs Edith Pretty, decided to dig into the mounds on her land. She soon handed the task over to a local archaeologist, Basil Brown, who found that some of the burial mounds had been stripped of anything of interest by grave robbers, but that “Mound 1” seemed to have been untouched.
Within Mound 1 he found the famous ship burial, in the form of an impression in the sandy soil of a 27-metre long ship. Within the “ship” was an astonishing collection of grave goods.
Basil Brown contacted other archaeologists with a national reputation, and they continued to work on the site while keeping the knowledge of their finds secret from the general public. This was in any case wartime, when public attention was on more pressing matters.
The site continued to be excavated after the war, right up to the 1990s. It is now managed by the National Trust, although Mrs Pretty had decided at an early stage to donate all the finds to the British Museum. She died in 1942.

The finds at Sutton Hoo
There was no sign of King Raedwald’s body, which would have been dissolved by the acidic soils of the burial mound, but it is clear from the position of the grave goods that he was not cremated.
It is also clear that his was a Christian burial, because close to the body were two silver spoons inscribed “Saulos” and “Paulos”, these being the names of St Paul before and after his conversion. There were also ten silver bowls from the Holy Land.
However, most attention has been focused on the items that indicate the Pagan traditions still recognised in East Anglia at the time of Raedwald’s death. There was, for example, a sword with a jewelled pommel and a purse containing coins to “pay the ferryman” who would take the dead king to his final reward of an afterlife among the gods and warriors of the past.
The coins in the purse, which was of an intricate design and would have hung from the king’s belt, came from different continental mints, thus indicating the extent of foreign trade that was carried out at the time.
Raedwald would have been buried in a fine cloak, the cloth of which has long since disappeared. However, the jewelled gold clasps and buckles from this cloak were of the highest quality and demonstrate an advanced degree of workmanship. The “great buckle” is particularly fine, being made of gold and inscribed with an intricate pattern. It contains a small secret compartment that might have been used to house a holy relic.
One very interesting find was a coat of chain-mail in which the links were alternately riveted and welded. Other clothing included leather shoes.
The grave contained fragments of textiles, of which a considerable amount had clearly been buried. From what has been preserved, it is clear that weavers of the time were skilled in design techniques and had access to a range of coloured threads. Some of the textiles may well have been imported.
The king had a quantity of household goods to accompany him, including drinking horns, cups, knives and plates.
Pride of place among the objects found at Sutton Hoo must go to the king’s helmet, which has become the symbol of Sutton Hoo. Intricately worked bronze and iron plaques were attached to an iron skull cap, but even more remarkable was the face mask that included eyebrows picked out in garnets and a full bronze moustache. One has to assume that this was intended to be a portrait of King Raedwald – if so he continues to look at us from a distance of 1400 years.

What Sutton Hoo teaches us
The main lesson of Sutton Hoo is that the term “Dark Ages” to describe the period of around 300 years after the departure of the Romans from Britain is hardly fair. This implies that civil society broke down completely and that the country was in a virtual state of anarchy.
However, the Sutton Hoo finds show that the early Anglo-Saxon kingdoms recognised the rule of law and were sufficiently peaceful for trade to flourish and craftsmen to develop a high degree of sophistication in the good they produced. At least as far as the upper strata of society were concerned, it was possible to live a secure life surrounded by the trappings of luxury.
The evidence of the spread of Christianity to the kingdoms of men such as Raedwald implies that literacy and education would have been encouraged, as would the social order that comes from the development of dioceses and parishes that Christian bureaucracy would have introduced.
As well as marvelling at the treasures of Sutton Hoo, one can also reflect on the fact that the so-called Dark Ages admitted a greater degree of light than had previously been thought.
© John Welford

Monday, 26 March 2018

The rebellion of the Fifth Monarchists, 1661


The Fifth Monarchists were a group of radical dissenters who had initially been supporters of the Republican regime of Oliver Cromwell (but later severe critics) and who launched an armed rebellion against the restoration of King Charles II in January 1661.

The name came from their belief that only Jesus Christ was entitled to be the King of England, along of course with the rest of the world. According to the Old Testament Book of Daniel, Nebuchadnezzar had dreamed that four great empires would arise, and the Fifth Monarchists believed that these had already come and gone, the final one being that of the Romans. That meant that the fifth monarchy, that of Christ, was overdue.

The Fifth Monarchists were led by a former cooper (barrel-maker) named Thomas Venner, who launched his intended revolution on Christ’s behalf on Sunday 6th January 1661. His small band of men burst into St Paul’s Cathedral and announced that Christ, and not Charles II, was king. The reaction of the congregation was not to immediately join their ranks but to chase them off, aided by the Lord Mayor who had called out the local militia.

The Monarchists retreated to North London for the next few days, but they returned on 9th January and caused mayhem in the streets of London. Venner and his men were perfectly prepared to use force to get their way, and Venner himself killed three men before being cornered in a London pub and captured, suffering 19 injuries in the process.

The end of the rebellion was as might have been expected. Venner and the other ringleaders were swiftly tried and condemned to death. Thomas Venner was hanged, drawn and quartered (the usual punishment for traitors) on 19th January. The reign of Jesus Christ as the fifth monarch would have to wait a bit longer.

© John Welford

Saturday, 24 March 2018

The Battle of Towton,1461


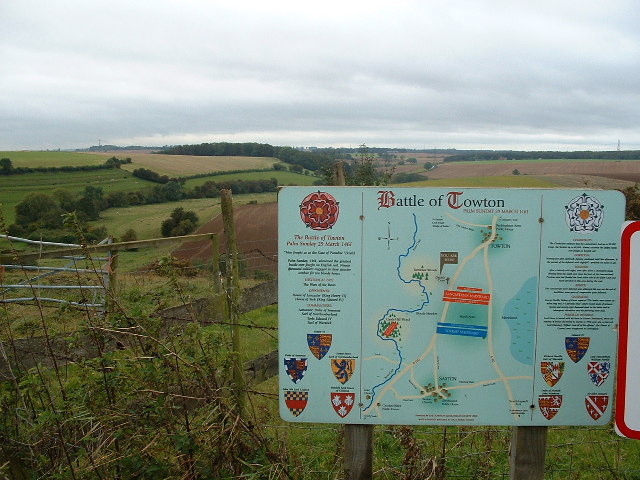
The Battle of Towton, fought on 29th March 1461, holds the record as the bloodiest battle ever fought on English soil with an estimated 20,000 men (maybe more) being killed. The battle marked an important stage in the so-called Wars of the Roses because it ended the reign of King Henry VI (although he was to return to the throne briefly nine years later) and saw the triumph of King Edward IV.

The term Wars of the Roses was not a contemporary one and only came into common use during the 19th century. It is based on a fiction invented by William Shakespeare in his play King Henry VI Part 1 (Act 2 Scene IV), in which nobles pick red or white roses to indicate which side they are on.

The two opposing houses of Lancaster and York took their names from the third and fourth surviving sons of King Edward III, namely John, Duke of Lancaster and Edmund, Duke of York. They were the great-grandfathers, respectively, of Henry VI and Edward IV. The house of Lancaster has traditionally been represented by a red rose and the House of York by a white one, but, although the Yorkist forces did use the white rose as their badge, there is no evidence that the Lancastrians used the red rose.

The civil war for the mastery of England had already been running for 18 months when the armies of Henry and Edward met at Towton, which is 12 miles southwest of York. The day was Palm Sunday and the weather was bitterly cold with a strong wind whipping snow flurries into the faces of the troops – possibly as many as 50,000 – who were camped in readiness for battle. The Lancastrians probably outnumbered the Yorkists by as many as 5,000 men.

No eyewitness accounts of the battle have survived, but it seems clear that, after a preliminary exchange of arrows, Henry’s army charged and at first seemed to have the upper hand. Edward (aged18) fought in the front line and his personal bravery inspired his men. He was greatly helped by the arrival of fresh troops under the command of the Duke of Norfolk, these joining the fray as the snowstorm grew steadily worse.

Perceiving that the battle was lost, many Lancastrian soldiers tried to escape, but in the confusion caused by the poor visibility many found themselves trapped in the Cock Beck, a stream of no great width but fast-flowing with extremely cold water. Many men were weighed down by their armour and pushed under by those following behind. Many of the casualties suffered by the Lancastrians were caused by this means.

Henry, who did not take an active part in the battle due to his fragile mental state, escaped and fled to Scotland, leaving Edward to usurp the crown. However, the Lancastrian cause was not completely lost. Henry would have a second reign after Edward lost support in 1470 and his former ally the Earl of Warwick (known to history as the “Kingmaker”) turned against him and was instrumental in Henry regaining the throne. This would prove to be a short interregnum for Edward IV, who triumphed at later battles (Barnet and Tewkesbury in 1471) and continued to reign until his death in 1483.

©John Welford

Monday, 19 March 2018

John Appleby reluctantly takes to the air


The first man to take off from the ground and fly was not Orville Wright in 1903 but (it is believed) John Appleby, a coachman who was a highly reluctant pioneer of aviation fifty years earlier. He had his employer, Sir George Cayley, to thank for that.

Sir George Cayley

Born in 1773 at Brompton in Yorkshire, George Cayley was born into wealth and privilege. He inherited his father’s baronetcy in 1792, with which came ownership of Brompton Hall and its large estate. At one time in his life he represented Scarborough as its Whig Member of Parliament.

However, having a considerable amount of leisure time on his hands, he decided to put that time to good use in the investigation of scientific and engineering matters. He had varied interests but is best remembered for his lifelong desire to find a way of getting a man to fly like a bird.

From watching seagulls gliding on the wind he soon deduced that something as heavy as a man could only get airborne if his “wings” were still rather than flapping, and from that he proposed that there were four fundamental forces that had to be co-ordinated, namely gravity, lift, drag and thrust.

He was the first man to realise that a wing would provide lift if it was shaped in such a way that the airflow above and below moved at different speeds when the wing was in forward motion. This is the principle that has been behind fixed-wing flight ever since.

A machine takes shape

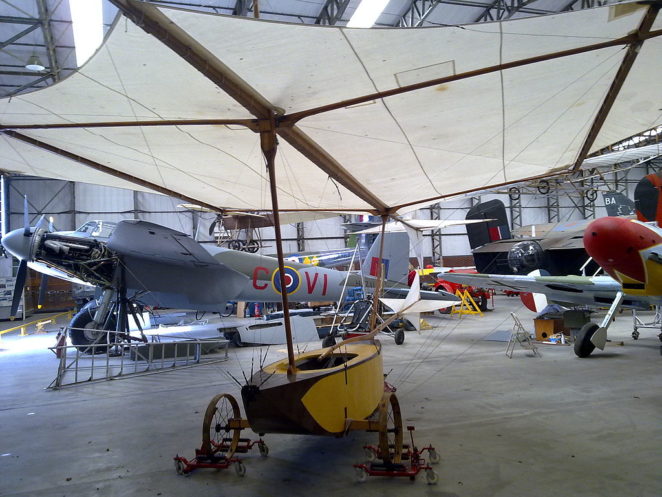
Sir George Cayley spent many years working on his theories and building models that put these theories into practice. However, it was not until 1853 that he was able to build and test a real man-carrying flying machine. This was a monoplane with kite-shaped wings made from cloth to the extent of around 500 square feet (46 square metres), an adjustable tail and fin, a boat-shaped cockpit slung underneath and a tricycle undercarriage.

Sir George, having spent a lifetime working on this project, was now an old man of 80, and therefore not suitable as the first pilot. There have been suggestions that he would have liked to make the experiment but his wife would have none of it!

Step forward, John Appleby

The next part of the narrative is admittedly uncertain, because there are conflicting versions of it, but it makes a good story and could possibly have been true.

John Appleby was Sir George’s coachman, who had witnessed all Sir George’s previous contraptions and experiments with bemused interest. When the glider was pulled into the open in front of the entire household, John peered at it a little too closely and was duly spotted by Sir George.

“Just the chap I was looking for”, said Sir George, and John Appleby found himself strapped into the cockpit before he knew what was happening.

The machine was wheeled to the top of a slope and pushed downhill. The basic theory proved correct and the forward momentum was enough to provide enough lift on the cambered wing to take the craft, and John Appleby, into the air above the valley in front of Brompton Hall.

The flight was a short one, with the craft making a crash landing on the other side of the valley. Sir George and the entire household rushed across on foot, to find the coachman only slightly injured but far from pleased. 

John Appleby glared at Sir George and promptly resigned his position, stating that he had been hired to drive carriages and not flying machines.

Sir George Cayley’s place in history

Sir George died in 1857 and so was not able to make any further experiments, such as building an improved design. It was therefore left to others to carry forward the notion that manned flight was possible.

The invention of the internal combustion engine made it possible to think of flight that not only started from level ground but could also be sustained in the air, despite the extra weight that would have to be carried. This was clearly where the future lay, but it would be another 50 years before the Wright brothers were able to make this dream a reality.

That said, Sir George Cayley’s theories were largely correct and only lacked other technologies to make them realisable. For that reason, Sir George and John Appleby (assuming that this part of the story is true) deserve their place in the history of aviation.


© John Welford